Wednesday, June 25, 2014

Short Trips Can Be Fun - Where to Go? And How To Do It!

    I bought my RV so when I had 2 or more days to string together into an mini-vacation, I could just go. No reservations, no packing. Just pick a direction and set off for parts unknown. After trying that for a while, it became obvious that a tiny bit of pre-planning would be beneficial. Having a destination, even a few choices, makes the road travel section of a short trip more efficient. Besides, I've found more cool places to visit that are relatively close by, simply by doing the trip research. Believe me, on a short trip it's better to maximize the relaxation and minimize the rushing around!

Begin by figuring out how much time you have in total. For example, let's say I just found out that I will have a Saturday and a Sunday off. (Not that this really ever happens! but...you get the idea) On a two day jaunt I try and limit travel time to 4 hours total. At an average speed of 60MPH (obviously put in you own speeds here!) you can go 240 Miles in that time. That's a decent range. Now look for interesting things within a 240 mile circle from your home base. Look online and/or at your past trips to see what's in easy driving range.  You'll be VERY surprised at how much there is to do close by.

So figure you work Friday until....whatever time. The way I do it? I get home, turn on the RV fridge to cool down overnight. Make sure I have all the perishables ready to go stored in my home fridge. Pack any last minute essentials, with the exception of things like milk, meat, etc. I try and figure out what kinds of fresh food I'm going to cook while away. Sometimes, if there's time, I pre-cut and/or clean vegetables or even pre-cook some pasta to use in a recipe. Anything to make the trip less work and more relaxing. Not that I find cooking like work! Cleaning up on the other hand... My RV stands fully ready to go, so I don't have much to pack. Sometimes some odds and ends, clothing wise and a few pieces of electronics. The laptop...you get the idea. Next, get a good night's sleep! This is critical. You'll want to leave early in the AM to beat any traffic, have a pleasant relaxed drive, and maximize your time at your destination. Sometimes I leave the night before, get to my destination and make a quick meal. Then I relax and sleep. I do agree that the journey is often just as fun!

Now let's talk about where to go. I prefer (almost exclusively) to boondock. My RV is fully self sufficient for up to 14 days by myself and around 10 days with a passenger. Seeing that these trips are much less that that...I can camp almost anywhere. I look for off the beaten path places, ideally next to a lake or stream. MAKE SURE YOU ARE ALLOWED TO BE THERE!!!!! There are plenty of Federal, State, County, Town , Village, etc. parks that you can easily get permission to be at for a couple of days. I'm fortunate that I have many friends with property all around the state. Not only do I get a nice place to stay, I get to visit with them, cook a meal, laugh...well, you get the idea! It's supposed to be a relaxing vacation.

In addition to plain old beautiful places, I've gone to Aviation museums, Giant outdoor sports mega-stores, balloon launches, historic places, you name it...I'll try it. Always looking for something new.

All in all...I'd like to have more time to Wander. Eventually, I'll be able to retire and travel the highways and byways of this great country. But for now, I'll take what I can get!

Be Seeing You... Down The Road,

Rich "The Wanderman"
www.thewanderman.com

Subscribe to the weekly RVtravel.com newsletter or one of our other newsletters about RVing. Great information and advice. Now in our 14th year. Learn more or subscribe.

Wednesday, June 18, 2014

Leak Patrol! - Yet Another Vent Removal & Replacement

    Some days you get the bear and some days it gets you. After last week's battery almost meltdown and fire, I thought I was "safe" for at least a little while. Nope..As I always say, "Murphy was an optimist!" We've had a fair amount of rain these past few weeks and I discovered a leak coming through my front 14"x 14" fantastic fan/vent. It was pretty bad. Stains on the carpeted ceiling and rusted screws. I HAD to fix it. or risk severe damage to the wooden and steel understructure of the roof. Given time, water will find a way to ruin wood and steel. that's just how it works.


Fixing this kind of thing the right way will almost always involves removing the entire assembly from the roof and re-installing it. Of course I had just gone over the 4 seams with eternabond tape, so thought I was safe from leaks. Nope. So in between rainstorms... seriously, I almost didn't make it (It rained a couple of hours after I got the sealant on!)
First, removing eternabond tape is not fun at all. You pull it up while simultaneously slicing it with a razor knife getting as much of the adhesive residue off as you can. Since I am going to replace it with new tape, I didn't have to clean it off the roof. This is a GOOD thing.

Once it was all removed, I could see the cracks in the old sealant AND all the places that previous owners had attempted to re-seal them with silicone. Most sealants and repair bonds will NOT stick to silicone very well. Or at all. Most of it simply peeled right off. some I had to scrape with a putty knife to get it started.. Some was really resistant and tough, likely this was the original seal from the factory. I scraped everything down to bare roof material (fiberglass in my case) and wiped it down with alcohol before I began re-sealing. Next I had to remove the vent and fan assembly from the roof.

You have to remove all the screws in both the top and inside vent trim...some of them wouldn't screw out because the wood was rotted and wet. Just put a lever (putty knife, screwdriver, etc.) under the screw head and gently unscrew. Should come out easily. I removed the rotted wood and replaced it with plastic shims from a home store. You can screw into these and they won't rot or rust! Then clean both the underside of the vent housing AND the roof where it attaches. I then used some double sided tape similar to eternabond to attach the vent housing to the roof.  Run a small bead around the underside of the vent housing and place in the opening. You could also put some sealant in the existing holes.
 This is your first seal, so make sure it's pressed down evenly and firmly before continuing.

Next up is putting in new screws. I went with SLIGHTLY larger and longer stainless steel screws. They fit through the exiting holes in the vent housing and would "bite" better into the wood underneath. As you tighten the screws, some sealant should leak out from underneath. THIS IS NORMAL! and assures you of a good seal. Next up, run a small bead around the edges and over the now tightened screws. i used self-leveling sealant, so it will flatten itself out over time, while it cures/dries. Make sure everything is secure and  begin your cleanup. I decided to let it cure/dry for at least a week before re-applying the tape.
 Partially for aesthetics, and mostly because I am too lazy to remove all the leftover adhesive!

It rained a couple of hours after I had applied the sealant, luckily it had "skinned up" well enough to resist water and I could detect no leaks. This was NOT what I had planned on doing Saturday. But....what are you gonna do?

Be Seeing You...Down The Road,

Rich "The Wanderman"
www.thewanderman.com

Wednesday, June 11, 2014

Time For New Batteries - Warning!

    Last week, I was surprised by an almost complete meltdown and almost fire with my two battery house bank. Not good. Could I have avoided the near catastrophic event? Maybe. In any case, heed my cautionary tale. As many of you know, I finally finished the roof installation of the second generation of my semi-flexible solar panels. These put out a good bit more power, have no anodized aluminum to fail (and short out the whole panel!) are a bit lighter and are slightly smaller. Since everything was buttoned up and the junction box's leads soldered, I figured it was time to really test the system before a major trip.
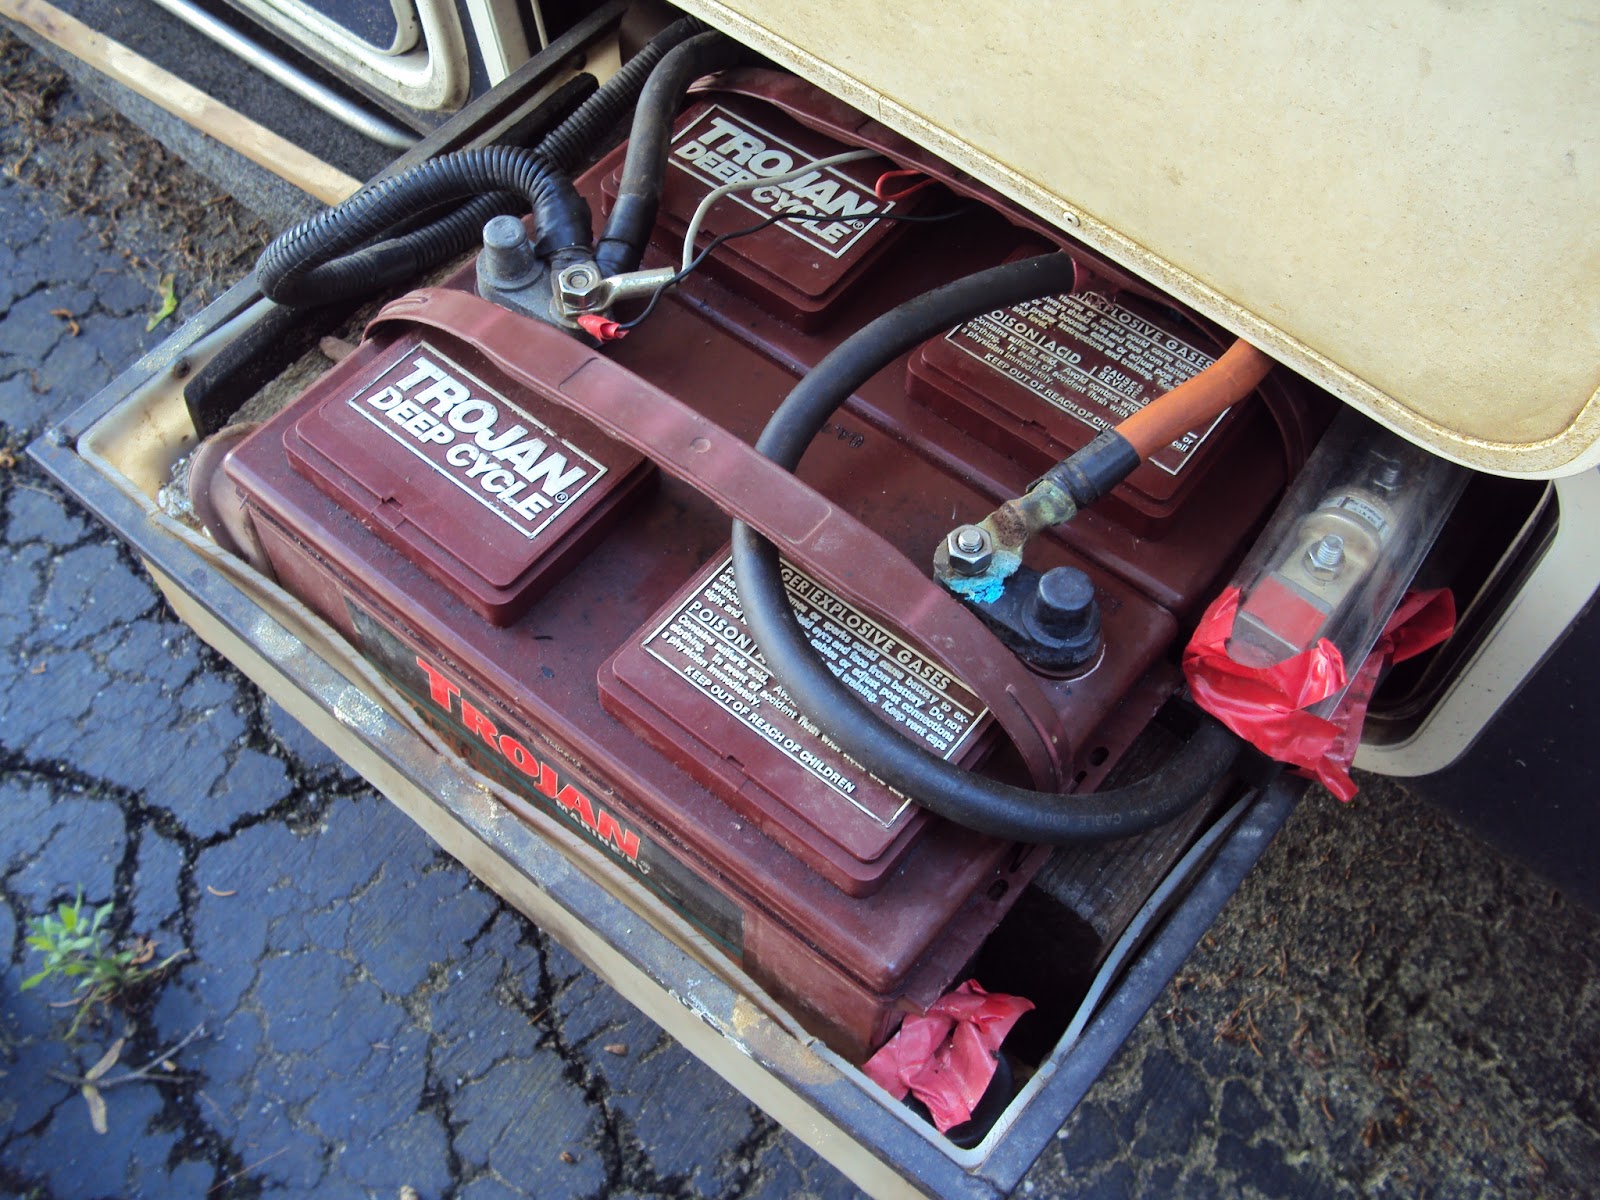
Old Battery Installation
So I unplugged from shore power that night and ran a few items for a while (a long while) to run down the batteries. Seemed like everything was fine. I used about 55 Ah worth of power (the Bank has/had 210 Ah/2 = 105Ah @ 50%) As per my new battery monitor. All seemed well enough. I shut everything off and locked up the RV for the night. The solar charging system would "fill up" the batteries in the AM when there was some sun. At about 9 AM the following morning I went down to check on the status and was shocked to see the battery temperatures above 90 degrees F!


Cooked Battery
They seemed to be charging OK, it was a bit warm out....I decided to wait and see. Went off to teach a class for the day. Upon my return, the batteries were at 125 degrees F!!! This is BAD! I could smell the acid from 3 feet away. I immediately opened the battery compartment to see grey smoke coming out of the front battery. Not vapor...actual SMOKE! I went in, shut down all charging and came back out with a non-contact thermometer to check the actual temperatures. The front battery was at 211 degrees F and the rear at 140 degrees F. I disconnected the front battery and gently removed it (making sure no acid was coming out.) I probably should have let it cool a bit, but I LIKE my RV and prefer it not to be toasted and crispy. The other battery began to cool quickly. When it reached the outside temperature of 81 degrees F I reconnected the second battery to the system. When the charging system was reconnected all look OK.

When tested, the front battery had two completely failed cells. It would have killed the other battery in short order. As it is, the other battery's life span has been severely shortened. The result of all this terror? Time to buy new batteries. I was hoping to put that off until Lithium Phosphate (LiFePO3) were ready for prime time or at least reasonably priced. They are still at least $1500 or more per battery for the ones I want. So, for now, I sought out and found 2 slightly larger Trojan Batteries. My battery drawer is quite small, but was originally intended to fit 3 Group 24 Batteries. One for the engine start, and two for the "house." I had 2 Trojan 27TMX's in there.

My Engine start/chassis battery was installed in the engine bay before I purchased the RV...likely at the factory. It has a Trik-L-Start battery maintainer and a separate switch so I can completely isolate it from the house system manually.The house batteries were about 7+ Years old. Thankfully I managed to beat their "normal" life by treating them well. Since the battery box/drawer is about 18"x14"x10" I could get two group 31 batteries in there with a bit of room to spare. I selected the Trojan SCS225. It would fit and would give me an additional 25 Ah to play with. (130 vs 105 each battery)

I managed to locate a pair "only" 2 hours away. Quick road trip and I had them back home. Shut down all power in/to the RV and disconnected all battery cables. Making sure to note where each one went and whether it was positive or negative!! Lifted out the other old battery and then cleaned all the acid and corrosion out off the compartment. Checked the fluid levels in the new batteries then placed them in the box, shimmed them to make sure they didn't slide around and reconnected the cables. The new batteries have two 3/8" threaded stud terminals, so reconnecting was easy.

Now for the moment of truth...I switched on the charger. The battery temperatures were 66 degrees F. Then I watched. And Watched some more. They were charging! After several hours, the battery temps never rose above 71 degrees F even though the outside temperatures went from 64 to 82 degrees F and the battery compartment was in full sun. I closed up the drawer and continued to monitor over the next few hours and days. Battery temperatures were OK, charge rates were fine. I took a deep breath, all was right in the world


This could have gone the other way. I could have come home to an charred wreck of an RV. I have no one to blame but myself. Batteries need to be monitored and checked. If you are used to seeing a particular set of readings and they change for some inexplicable reason (you didn't change/add/modify anything) be wary!! It could end in disaster. Next week, I will do some real world testing on capacity, but the manufacturer states I will not get full capacity before I hit 10 discharge/charge cycles. We'll have to see.

Be Seeing You...Down The Road,

Rich "The Wanderman"
www.thewanderman.com


Wednesday, June 4, 2014

Even The Simple Things - A Corkscrew


    I've really never been a big drinker, but that doesn't mean I won't have the odd bottle of wine while traveling. There are some BEAUTIFUL places around areas where vineyards are found. It isn't just Northern California! Often the owners will let you stay for a night or two while you take their tours and drink/buy their wares. It's a good idea to have a corkscrew on hand for those occasions. Maybe even two! You never know when the first one will break. I found one that takes up VERY little space and is under a dollar to boot. Well, 99 cents anyway.

Small, lightweight and you can cover the "screw" portion so as not to get poked when sifting through the drawer to find the darn thing! Now, when I first saw this gadget, the first thing I thought was, "It's plastic." Well, it is. BUT ... so far, it works fine. You can feel the resistance of the metal corkscrew going into the cork, but if you are smooth and the cork isn't rock hard it should be fine. I opened a few bottles with it over the weekend (it was my Dad's birthday -- he's 91!), and no cracks or breakages. Pulled the corks out smoothly. Of course the old butterfly style is better, but for the RV and limited use, this one is great!

Now I am going to have to figure out where to store wine bottles in my "storage-challenged" RV! Hmmm ... maybe a built-in wine rack in the main pantry closet? Maybe a few PVC pipes glued together, sitting on the floor of that closet would work. I would be a lot less paranoid about them falling and breaking open, spilling their highly staining contents all over the place. Did I mention I hate cleaning?!

I hear some red wine each day is supposed to be good for you?? The problem with finding a mostly insignificant gadget like this one is you run the risk of becoming a fan of wine! People spend years learning all about wine. I'm more of the "if it tastes good, drink it" type of guy. I understand there is an art to fine wine, but that's not really me. I'm always happy to learn more about any subject, but when the "good stuff" can be HUNDREDS of dollars a bottle ... well, maybe I'll stick to the serviceable but still good types!

So, what have we learned? Aside from the fact that I can be a bit on the frugal (cheap) side? Simple things require simple solutions unless you're a guy named Rube. Then ... Well, you get the idea!

Be Seeing You...Down The Road,

Rich "The Wanderman"
www.thewanderman.com