Wednesday, June 24, 2015

Tackling The More Difficult - Engine Fan Clutch Replacment

The Engine Cover!
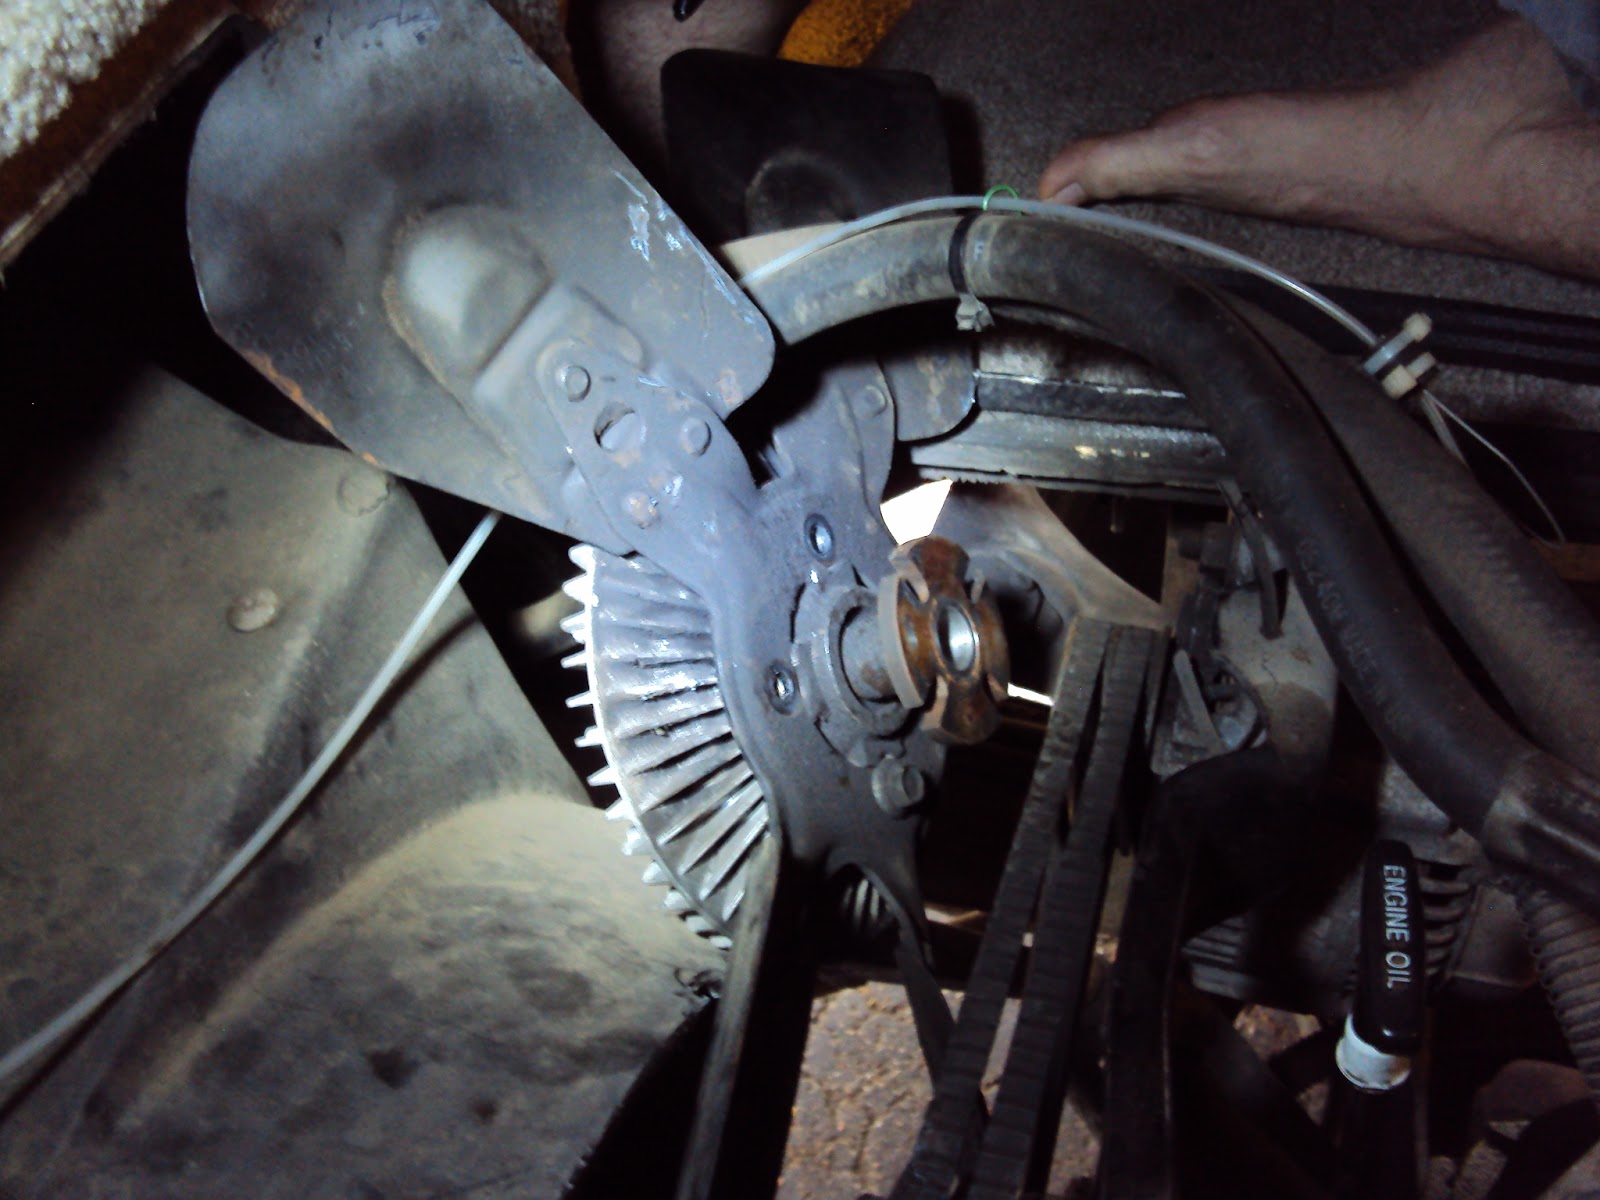
    I really enjoy fixing things. I also like the money savings you receive when you do something yourself that would cost a significant amount at a professional shop. I am NOT suggesting every job is do-able at home, but most are. Lately, I had noticed an increase in engine coolant temperatures while driving in warm weather. Since I had already installed an electric auxiliary radiator fan and a transmission oil cooler fan, the temps were still manageable They weren't above the red line, so I just monitored them and switched on the fans when needed. On a long drive last weekend I noticed the loud engine driven fan (which is directly below, and to the right, of me since the engine is mostly inside the cabin below a cover) wasn't nearly as loud as it had been. Hmmm. After some diagnosis, the viscous fan clutch was found to be failing. Time to replace it.

The Engine!
How did I figure out it was on its proverbial last legs? Simple, with the engine cover off I rotated the fan. When it's cold the fan should turn relatively easily by hand (be careful, it's dirty!) After warming up the engine to idle operating temperature, rev it gently until it heats up, shut it down, remove the key and try turning it again. Should be much harder to do. Mine wasn't. Time to replace! Essentially, the viscous fan clutch works by sensing the temperature of the engine and opening (or closing) an internal valve to "lock" the fan to the engine's speed. This increases the fan speed and moves more air, cooling the engine. They don't last forever!

Once you have determined the fan clutch is bad, you've got to come up with a replacement. I did a bit of online research based upon my engine manufacturer and model. It wasn't to difficult to find. There were actually three models: a normal duty one, a heavy duty one and a "severe" duty one. They were so close in price, I chose the severe duty model. After ordering it online, it took 2 days to arrive and looked, essentially, the same as the old one...albeit with bigger cooling fins and a "beefier" outside case. Now I had to remove the old one. How hard could it be? Only four bolts needed to come out.


As you know....nothing is ever easy for me, but after reading a lot of articles from others who owned the same engine, I had found a great tip. This will work for most installations. Get two bolts that are the same size and thread number as the bolts that you are removing. Make sure they are at least 1 1/2" in length. Then cut the heads off! This will give you two "studs." Hang on...it will become obvious soon enough. Assemble your tools. I needed two 1/2" open-end wrenches, a large heavy flat bladed screw driver and the aforementioned home-made studs.


First remove two of the bolts holding the fan clutch to the drive pulley. Make sure they are diagonal from each other. Use the heavy duty screwdriver to gently rotate the fan to get to each bolt. Once they are screwed in finger tight, remove the other two bolts. You will now be able to remove the fan and the fan clutch from the pulley without having to remove any belts! If you have the room to take the entire assembly out, do it now. If you have full access it's very easy to remove the fan from the clutch and replace it with the new one. Then simply put the new assembled fan, and fan clutch, back over the two headless bolts and replace the other two to hold it on. Rotate to access the headless ones and remove them one at a time (replace the original bolt in the hole after each is removed). Tighten everything up. Check everything is tightened!!! Done.

Of course, test the same way as before. If, like me, your fan clutch was bad then you will notice a difference right away. Even repairs that seem daunting can be done with just a little research and patience. While your engine may be a different brand, make, year, etc., the above process should still work fine. The main issue is always access; how much room you have to do the work. Mine was very tight (I have some scratches and cuts to prove it!).

Be Seeing You...Down The Road,

Rich "The Wanderman"
www.thewanderman.com

Wednesday, June 17, 2015

I Hate Cleaning - But This Worked So Easily!!

Lots To Clean
    Everyone who reads my articles knows that cleaning the RV ... well, cleaning, in general ... is not my favorite thing to do. OK, if I am being honest -- I HATE cleaning. Anytime I can find someway to make that chore easier or faster I am all over it. Lately, my counter-tops and tables have been looking a bit shabby. Regular cleaners weren't getting the dirt out of the tiny scratches or removing any of the stains completely. Truthfully, I use my main table for everything including soldering lights and working on somewhat dirty components. A friend of mine suggested using cheap toothpaste to get it back to perfect again. I was obviously skeptical about that. Not anymore!!

Wow!
The idea is simple. Toothpaste contains a very mild abrasive and various other gentle cleaners for your teeth. It figures that it should be gentle enough to clean other things. My tables are hardwood with a laminate (like Formica) attached to the top surface. There's wood around the edges. Many RVs have something similar. This trick will work on all of them. Simply take a small amount (about the size of a couple of peas) on a soft cloth or paper towel. Add a bit of water on the surface and slowly rub in circles. NOT hard ... just gently. Make circles, bigger and bigger. After a minute or so wipe with a clean cloth. That's it! Clean and new looking. With a fresh minty scent!!

I've found this technique will work on almost any hard smooth surface. I've used it on my shower stall, the lid of the toilet, the base of the toilet, my counter tops by the sink, and even the sink itself. I am going to try it on some outside surfaces next ... maybe it will work on dull chrome?? You should ALWAYS check to make sure the surface in question can handle the treatment BEFORE you go all in. Trust me ... I have ruined many things because I was in a hurry to get the cleaning over and used the incorrect cleaner! Now I can't get the stain from the wrong cleaner removed ... even with the right cleaner!


If you are as "cleaning averse" as I, these kinds of tips are worth their weight in gold!

Be Seeing You...Down The Road,

Rich "The Wanderman"
www.thewanderman.com

Wednesday, June 10, 2015

Even The Simple REPAIRS - Cleaning & Refurbishing Exterior Lights

Lots Of Lights!
    My RV has Clearance lights....lots of them! They aren't really sealed very well from the elements. The covers simply snap on and are held in place by a small plastic tab. Water and dirt get in all the time, especially at speed. Eventually the copper/brass contacts and wires corrode to the point they are hindering the flow of electricity into the bulbs and the lights go dim or, worse, out. In many states they are a DOT requirement. Removing and replacing them with sealed LED units would be great. Swapping in LED bulbs is good, too. What if you just want them to work? No problem, here's how.


Lights Out!
Get yourself a sturdy ladder. Since these lights run along the top/side edge of your RV, you really want a sturdy work platform! Take a good look at your lights. I began with the ones that were out, but the basic section of this maintenance can be performed on working lights as well. Preventive maintenance is a GOOD thing! Begin by looking at the light itself. Is it (like mine) the type that the lens simply pulls off? Mine pull up a bit from the bottom edge then lift off. They COULD have a couple of screws holding the lens on. If so...unscrew them! Of course, if your lens is watertight you may only have to replace the bulb if it's been leaking. Then make sure the leak is repaired! A little bathroom-style caulk goes a LONG way for a fix. Use VERY little and be prepared to wipe away the excess!

Typical Light Fixture
Once you get the light fixture open, wiggle the bulb with the power on. Did it turn on, even for a second? Then you may just have to clean the contacts or re-insert the bare wire end into the clips. To clean them, make sure the power is OFF!! Then use a fine wire brush for bad corrosion first. If it's not too bad (you can see the bare metal underneath) use a fine grade of sandpaper or some steel wool. If it's just dirty, a pencil eraser rubbed on the contacts (bulb, too!) works wonders. Since I already have the lens off, I like to clean all the surfaces. On mine, the lens gets really dirty on the inside and that reduces light output significantly.


See, STILL Out!
Put the bulbs back in and turn on the power. Make sure everything is working. If not...try another bulb before you start playing with contacts and wires! Turn off the power. Now put the lenses back on using the reverse of the way they came off. Go and turn the power BACK on and check that the lights are working. Give each one a light tap to confirm that they STAY on! Sometimes they are making contact, but so lightly they become intermittent. If you get a bad one, turn off the power again, take out the bulb and try another (known) good bulb. If that doesn't fix it look at the contacts that are touching the BACK of the bulb. Make sure they have enough spring tension pushing them against the bulb. Often they become weaker with age and use. BE VERY CAREFUL if you want to bend the clip a bit...they become fragile with age and are very easy to snap off. Then you DO need a replacement fixture. Ask me, I know...two of mine snapped quite easily.

That's it. Not very complicated nor difficult. Can be done on a cool early evening in a hour or so. Maybe less. Will definitely save you $$$ over going to the RV service emporium.

Be Seeing You...Down The Road,

Rich "The Wanderman"
www.thewanderman.com

Wednesday, June 3, 2015

Filter Your Fresh Water Going In! - Easily With No Frustrations

Ready To Go!
    I have a full-on anti-microbial and pretty much everything else filter under my galley sink AND one I can attach to the faucet. This does NOT mean I don't pre-filter the incoming water that goes into my fresh water tank. Fresh water is so vitally important for humans and their pets, you cannot overestimate the importance of clean water. The frugal (read "cheap") side of me likes the idea of extending the life of my expensive tiny-micron filters by taking out lots of stuff before it does it's work. Enter the basic carbon filter. These are everywhere and come in various brands, but are all very similar. The main issue is getting them to work without multiple hoses and the headaches that come with them. Here's how I make it work with a minimum of fuss.

First, buy a filter. Sounds obvious, but I am writing that first one for a reason. Several of the filters on the market (usually sold individually) come with a short section of hose with male and female ends and a spring wrapped around them for strain relief. You NEED one of these. Yes, you can make one from a cut piece of old hose. Usually from one someone has driven over the end of. (Yes, I have done that many times over the years.) I prefer the pre-made one. It's made for potable water use and it's a very convenient size with a large plastic "nut" that is easy to turn.


Just About Full
Second, remove the rubber/vinyl caps from the filter. Next, screw the hose end into the outlet end of the water filter and connect your garden hose to the inlet side. Simply place the unconnected end of the short piece into your gravity water fill (or, if you don't have one, screw it onto the city water inlet) then turn on the water...SLOWLY..so the pressure does not pop it out of the fill hole. That's it. The tank will fill. How long it takes is directly related to how big your tank is and how empty it has gotten. I usually do something else, but stay close by to shut off the water when it slightly overflows.


Make sure, when you are done, you disconnect the ends and empty the filter. Lots of water remains in the filter after use. The rubber/vinyl caps do NOT always seal well and you may end up with water in your storage bay or worse. After emptying it, put the caps back on. Close up the water inlet and Store the filter and hose end. Done.

All in all, fast and easy and you haven't used a full length potable water hose at all. Convenient if you have a long hose run and only have one of them. Work smarter, not harder!

Be Seeing You...Down The Road,

Rich "The Wanderman"
www.thewanderman.com