Wednesday, May 28, 2014

Even The Simple Things - Boiling Water


    Boiling water sounds simple enough. Fill a pot or kettle, light your propane stovetop and put it on the burner. Wait long enough and VOILA! boiling water. Sure, you could do it that way. I use that technique all the time. It works, it's simple, and is essentially fool-proof. Well NOTHING is 100% fool proof, but this is close. Why would you want another way to boil water? For me, personally, I like the ability to cook at least two ways on the road. With propane and with ELECTRICITY. This way, no matter where I am and whether or not I am connected to shore-power (or running the generator) I can boil water for whatever reason.

To make this work, I found a 12 Volt method of boiling water. It's elegant, and to be honest, pretty cool looking! You can mount it on a wall or simply place it on the counter. It takes about 23 minutes or so to boil a full pot of water. Plugs into any 12V cigarette lighter style outlet or can be hard-wired. I'm thinking about mounting the whole unit in the galley someplace (Where?) and permanently wiring it in. I'm also going to add a 12V outlet in the galley. Not sure where yet, but stay tuned! The base securely holds the pot, so it will not likely shift or move around when in transit.

The lid locks onto the pot, so unless it's really sloshing around it should stay in the container.
At home I get a lot of use out of an electric kettle. It's always handy to have boiling or hot water around for a recipe or you may simply want a cup of tea or soup. Either way, this works quite well. It has a 20 Oz. capacity, which is a decent amount for a small appliance, especially a 12V version. It will also shut off if the voltage is too high or too low! It will also shut itself off if it runs out of water, so it's safe enough to use unattended. There is a white LED that tells you when the pot is properly seated and a red "power-on" LED to let you know it's working.


This pot draws 8 Amps at 12 Volts (96 Watts) when it is running, so it's not too heavy a load for battery only use. I do recommend a 15 Amp fused outlet for this and some reasonably heavy gauge wire running to your outlet. many cigarette lighters are wired with thin gauge wire that won't put out enough current to use this device efficiently and will likely blow your fuse. It comes with a nice 4.5 foot cord, so you should be able to find a flat/stable place to put it when it's in use. The less current (amps) you get to the pot, the longer it will take to boil water. It pays to have heavy gauge wire running to your 12 Volt accessory outlets.

Overall, I like the multi-tasking utility of this appliance. Since it's natively 12 Volt, I do not have to run an inverter and take the ~15% or so conversion loss they introduce. In the early AM my new 2nd generation Solar panels are developing around 300-400 watts, so my batteries get charged quite quickly. With full sun I am getting a bit past 500 Watts now!  This pot will work "on the sun" easily. Less generator use in a quiet remote boondocking location is always nice. Of course, I'm more of a coffee man!

Be Seeing You...Down The Road,

Rich "The Wanderman"
www.thewanderman.com


Wednesday, May 21, 2014

Uh Oh! - Emergency Vent Leak Repair

Before With Tape
    Last week it rained here. A Lot. A REAL lot. For the first time in a long while I had a leak. When I got inside after the rain had stopped, I found a good section of my wall, next to the vanity sink had warped. The paneling had gotten long vertical "creases." I tracked the water back along the roof rib and all the way to one corner of the 14" roof vent (with fan) Once I had an idea where to look, I went on the roof and found the 4" Eternabond tape hadn't adhered over the hinge properly and had been seeping water underneath. Once it made it past the entire seal it was a simple matter for the water to travel through the foam and wood "sandwich" of my ceiling and damage the wall. There was almost no evidence other than the wall damage itself. No stains on the ceiling at all. Not really a great way to spend a weekend, but it had to be fixed before the next rain! Here's how.

First, I was going to simply lift up the Eternabond from the area it hadn't stuck to and replace it. Once I began, it wasn't all that difficult to remove the four pieces that went around the vent's edge. After that, I split the old sealing material and removed most of it. Once you pull on it, it will likely come off in long pieces. It was dried out and cracked. That's why I put the Eternabond tape over it, believing the seal would be sound. It wasn't. Once the old seal was removed, I pulled all the screws holding the vent to the roof and ceiling. May of them were wet and not holding very well.

Nasty OLD Caulk
Once removed, the vent and fan assembly came out easily. (After the interior trim bezel was removed!)There was NO seal at all under the "lip" of the vent. Next I cleaned the entire roof where the vent would sit AND the entire surface of the vent lip where it would sit on the roof. Since there was water damage to the wood and foam ceiling sandwich, I used shims (wood) to replace the wet sections and give the screws something to "bite." I used most of a vent fan installation kit, which is the double sided version of the Eternabond tape in a 2" size. That would secure and seal the lip all the way around. Next a bead of lap sealant was spread around outside the area the tape covered, but still under the lip. Also, lap sealant was applied INSIDE each screw hole.

Pine Needles Are Annoying!
Once the screws were in and tightened down (not TOO tight or they would strip) the extra sealant squeezed out from the lip and was smeared smooth with a finger. Then, of course, a wind came and spread pine needles on the still sticky sealant. I had done so well keeping my hands and fingers clean this time! Ah well. After picking out the debris, additional lap sealant was used on top of each screw to make sure no leaks would "sneak" by. Once the lap sealant fully cures (could be as long as 30 days!) Another 4 pieces of 4" Eternabond tape will cover the edges of the vent installation. It will look nicer and, hopefully, add some additional protection.

The entire job took about 2 hours. The longest, most tedious job was cleaning the old sealant and tape residue off. Take it slow and be careful of your roof material. Use the right solvent for the job!! You could severely damage your roof if you don't. A lot of folks are afraid to work on their roof and/or anything that could leak. It really wasn't that difficult, as long as you take it slowly and methodically. I wasn't happy I had to get it done, but now that it's repaired, I feel much better.

Be Seeing You...Down The Road,

Rich "The Wanderman"
www.thewanderman.com


Wednesday, May 14, 2014

Even The Simple Things - An Alarm Clock

    I never thought I would need or want an alarm clock when traveling. I mean, the whole idea is to relax and slow the pace down for a restful journey. For the most part, I have managed to do just that. Although, sometimes you simply have to get up in the morning to be somewhere or get something done. As many of you are well aware, I am NOT a morning person. Oh sure, I'll get up, but I won't be happy about it ... well, until I get at least one good cup of coffee! So, what's the least intrusive way of being rudely awakened from a comfortable sleep? An Alarm Clock, of course!

Great Clear Plastic Cover
Many years ago, when I was traveling much longer distances - airplanes, mostly - I used a wind-up folding alarm clock. It worked. Well, except that it ticked so loud you really didn't NEED the alarm since it kept you up all night anyway! And when the alarm did go off, it was a grating simulation of a bell. A flattened bell. Sounded horrible. Later on, I "graduated" to an electronic version that was surprisingly easy to set and the light beeping wasn't completely obnoxious. It was so gentle, sometimes it failed to rouse me at all. Hmmm. Back to the drawing board. My RV has Velcro-ready, carpeted ceilings and most walls, so adhering things temporarily is a cinch. The problem was, most clocks were designed to sit on a table. (And get knocked over onto the floor where you have to contort yourself to reach over and down to pick it up when it rings in the morning and you're in a bad mood already.) Where to find a "nicer" version that worked on the vertical?

In The Sleeping Area
The Internet! Look hard enough and you can find almost anything there. I found a flat clock with a protective plastic cover that just begged for a small piece of Velcro to be stuck on the back. It was even a Timex(!) and had Indiglo (a soft blue glowing backlight for reading at night). I remember when Timex was thought to be a great, tough, time-keeping brand. They even attached a Timex watch to an outboard motor in a 55-gallon drum, revved it up and it still worked! Well, to be honest, the strap broke but the watch was still running. It did work in rehearsal though! Sometimes I miss live television where anything can happen and actors had to be on their feet.

I digress. One corner of my sleeping area was perfect for this little workhorse of a clock. I tried a bunch of attachment locations before I found one I could see, with one eye open, early in the morning. It's easy to reach to shut off the alarm. AND the alarm sound isn't obnoxious enough to make me want to smash it into bits, but just insistent enough to wake even me. Now THAT'S progress!

Be Seeing You...Down The Road,

Rich "The Wanderman"
www.thewanderman.com


Wednesday, May 7, 2014

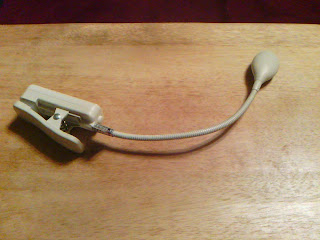
Even The Simple Things - Another Way Cool LED Clip-On Light

I've admitted this before, I like flashlights ... well, lights in general. LED's are really cool. They use a lot less power than a comparable incandescent bulb and run much cooler for longer hours. Anytime I am out shopping I have a mandatory stop down the flashlight and battery-powered lighting aisle. I was at IKEA a few weeks ago and stumbled over and purchased a nifty USB-powered light for my mini-laptop. I needed to return something yesterday and ended up finding a really useful LED clip-on light that puts out the most pleasing "warm" soft light. Perfect for ambiance or reading. No hotspots ... a pleasant glow.

It runs on 2 AA batteries and will last a LONG time (> 15 hours so far!!). It only draws .3 amps at 3 volts, so it's quite miserly. There is a small round button that "clicks on and clicks off" the light when pressed. It's located on the base where the gooseneck, fully adjustable stalk comes out.  The clip has silicone rubber "grippers" that open wide enough to accommodate most places you'll want to use it. It hasn't scratched nor marred any surfaces I have tried it on. It weighs almost nothing, so it doesn't shift during travel. The gooseneck lets me point it any which way. It's metal, so it stays where it's put.

The best thing about this little light? The output is soft and pleasing. More of a bright glow than a harsh light. It's somewhat directional, but covers a wide arc. I tried it out for reading and it didn't seem to cause any eyestrain. Contrast on the page was good. At distances greater than about 2 feet, the light drops off sharply. It could probably be used to see where you are putting your feet on those late night trips to the bathroom. Of course that would depend on where you clipped it on.

I like devices that just do what they are supposed to (and more!) without any fuss. This is one of those things. I'm a bit sad I didn't think to buy more of them! They come in Ivory and Black and were $3.99. Pretty good deal for something so useful.

Be Seeing You...Down The Road,

Rich "The Wanderman"
www.thewanderman.com