Wednesday, October 30, 2013

New Solar - Better Than The Old Solar - PART 2

Old Installation.
    Welcome to Part 2 of the new and improved Solar Panel install. (Click here for Part 1!) At this point, we have the prototypes temporarily mounted on the roof, with painter's tape. This was fine for static testing, Not so much for driving down the road! Since the old aluminum backed panels were adhered to the roof with a 3M product that wasn't really designed to come off, this was going to be a bit of a job. Not impossible, but not all that easy to do.

Hopefully, I won't have to do this ever again!


First One Removed!
We began with the rearmost panel. Since it was close to the ladder and the edge of the RV, we could access two sides and have an easier time trying to separate it from the roof. Sure we would. This 3M paralastic adhesive is a tenacious product. I figured I could use a thin length of wire with handles on either end to slice through the adhesive a little bit at a time. Nope. All that did was break the wire. So, we tried thicker wire....nope. We did manage to get one of the corners started....only about 1/2". Next up was a thin aluminum strip about 1" wide. Nope. Needless to say I was getting a bit frustrated.

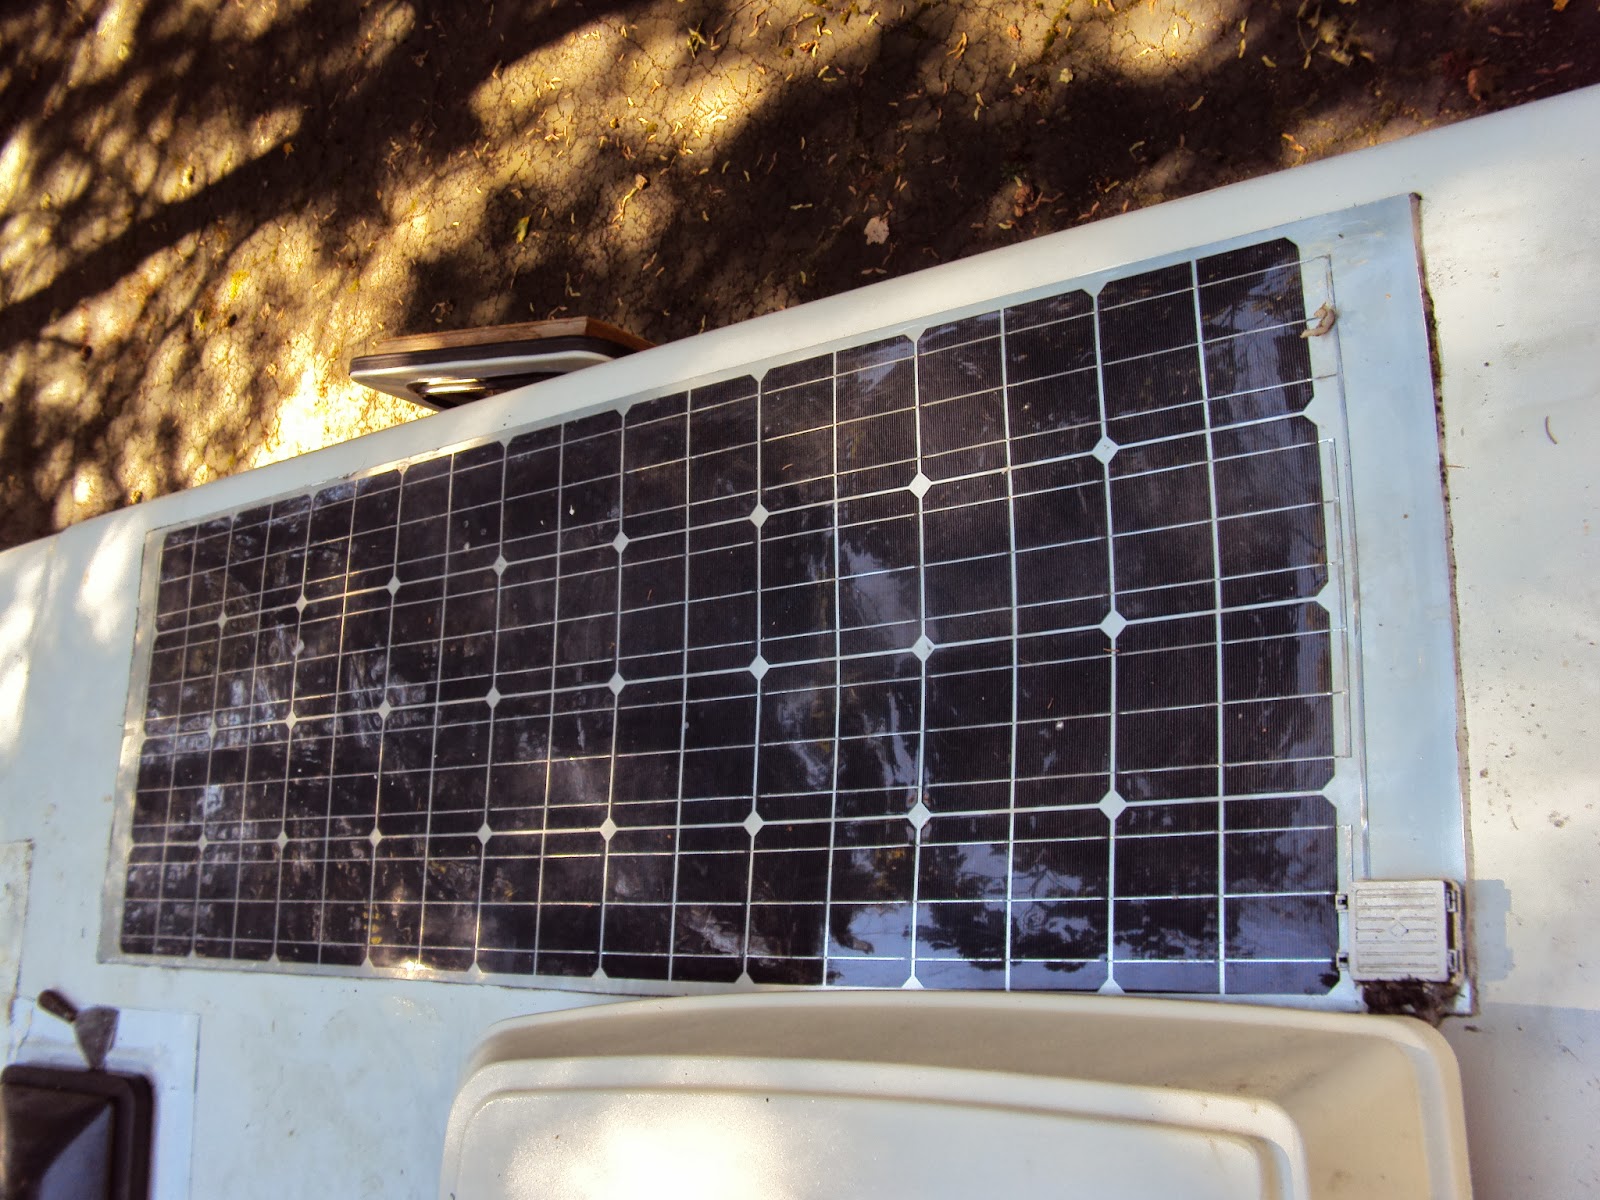
A Bit Dirty, But In Good Shape.
 Then a brainstorm! How about using a big putty knife? Thin, flexible and strong. I could wiggle it under the corner and begin slicing through the old adhesive a little bit at a time. It worked! It was slow and difficult, but after about an hour of struggle, we were able to lift off the old panel and see the roof once again!

There was a considerable amount of old adhesive residue left on the roof, but it scrapes off pretty easily. After that we'll use some alcohol to clean the whatever is left.

Old Junction Box For Re-Use

You'll notice I've left all of the wiring and the junction boxes intact. Junction boxes are where the Solar panels' themselves attach to the the wiring going to the charger. For this type of install these get adhered either to the top of the panel or the roof. The prototypes have enough extra material on the edge, so I will be mounting them there. Preparation of the surface will be critical to the longevity of the install. When I installed the last set of panels, we meticulously cleaned the surfaces before applying the adhesive. Later on in this series of articles we'll go over that again. Of course, at that point, I'll be almost finished!

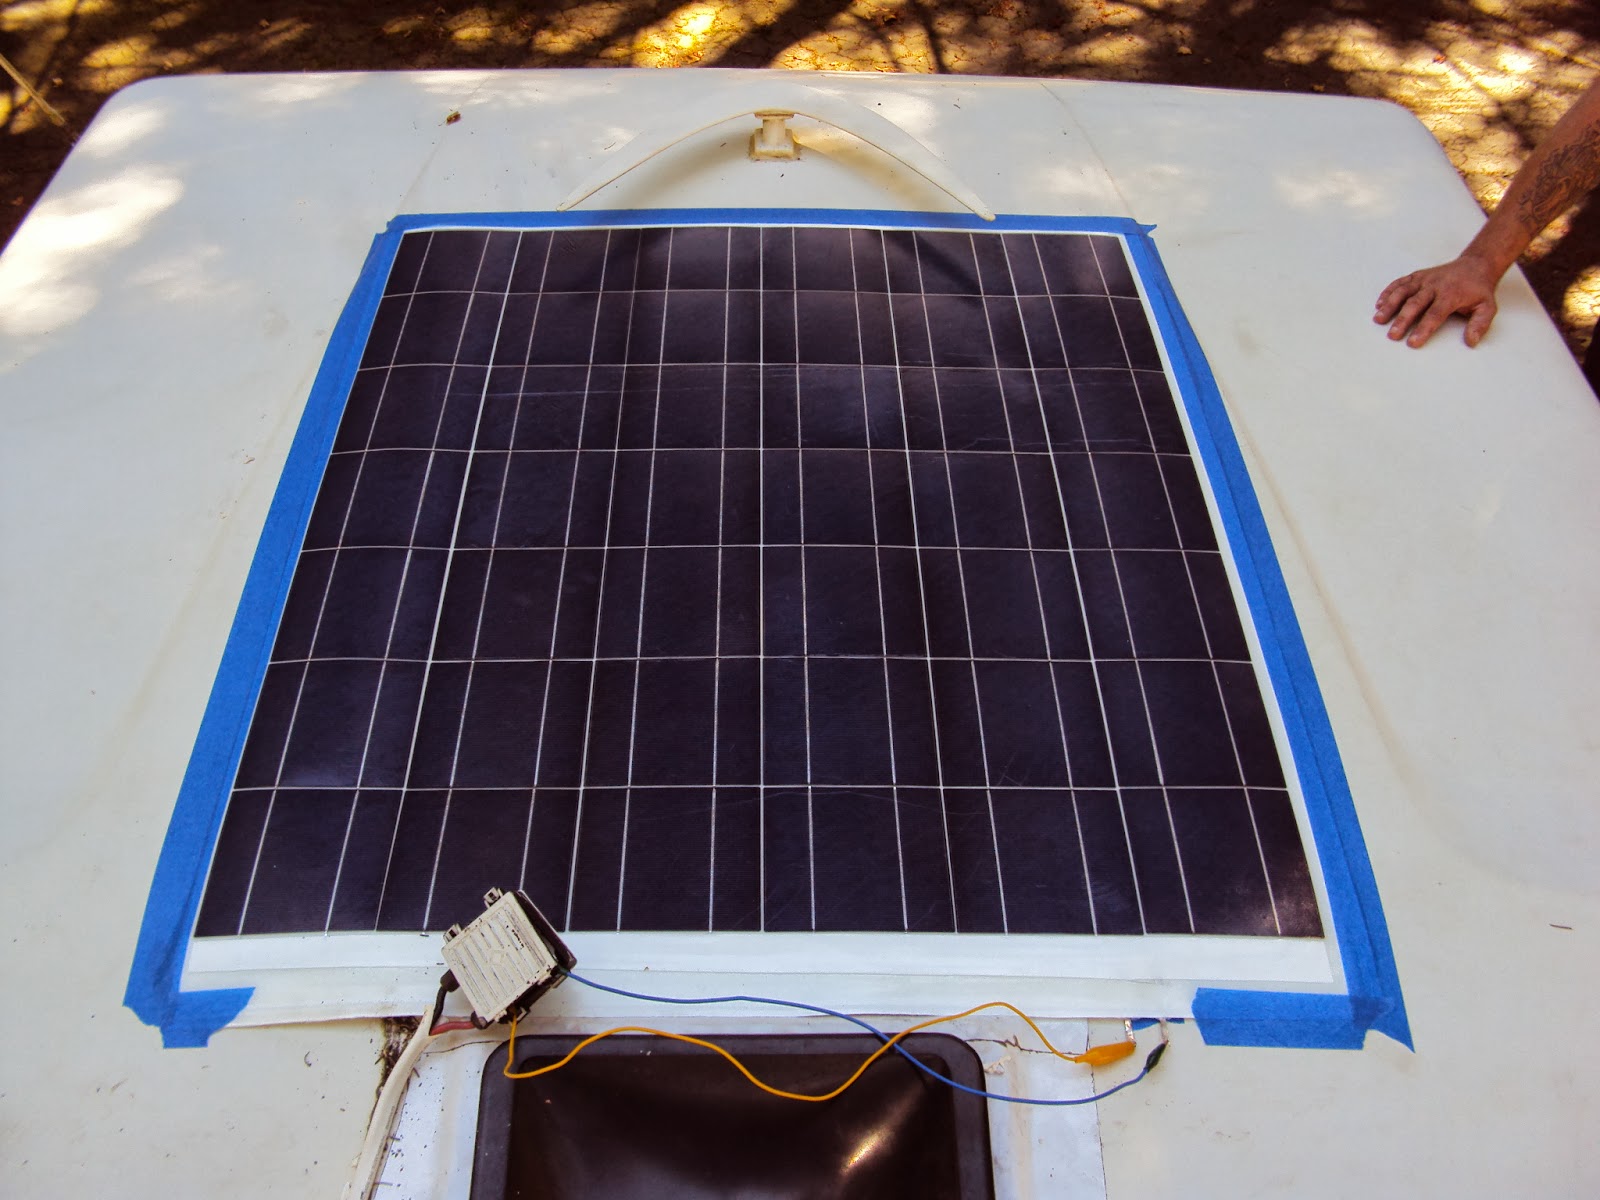
Last week, I installed 2 of the prototype panels on top of the old Aluminum backed ones. Just to test the efficiency and whether they would perform in a similar way. Well, after a week of testing I am happy to report these two are putting out slightly MORE power! There were a couple of mechanical problems...the wires that connect the junction boxes to the solar panel were on the wrong side, that we would have to change, but for a temporary test all was fine. I just used some alligator clips and wire to span the distance from the junction box to the panels output wires. To keep everything dry I put it all in some zip lock bags.

Not Pretty, But Functional!
I wouldn't recommend driving this way....

The successful test was a bright spot this week. I knew we were on the right track and that all this would end up being a better, lighter system that would give me more power to work with.

Next, I called the manufacturer. We're in pretty much constant contact on this project, as they are very interested in the RV marketplace. It's really nice that they are in the U.S. and only a few minutes away from my home base. We went over the small issues with wiring placement and made some dimensional changes. He promised me 3 new prototypes, better than the old ones next week.

Once they arrive, I will have removed the old panels, cleaned off the adhesives and prepped the roof surface and setup the wiring to accept them. We'll tape them up on the roof again for a few days to take power and efficiency readings before I make it all permanent. Needless to say, I am getting excited! Tune in next week for the tests and next steps!

Be Seeing You...Down The Road,

Rich "The Wanderman"
www.thewanderman.com

P.S. This is my 100th Article!! Yay!!


Wednesday, October 23, 2013

New Solar - Better Than The Old Solar - PART 1

    A few years ago, I set out to design, build and install a complete solar charging system on my RV. The goal was to be 100% power self-sufficient. Given the very limited space on my roof, I knew I had to seek out a solution that was better than typical aluminum framed, glass faced solar panels. You can read all about the design, sourcing and install of that system here. After almost 3 years that systems' panels have catastrophically failed. Over the time the system operational, it worked exceptionally well! My new system will work better and not be susceptible to the same problems as the old one. Here's why:

Amazingly Thin!
While the original system worked well, the semi-flexible solar panels were sourced from a factory in China. They had great specs and a reasonable price (if you take out the rather huge shipping costs!) They were similar to regular glass faced panels, but were a sandwich of aluminum and a special plastic instead of the glass. They weighed ALOT less than traditional solar panels. 7-8 lbs. vs 20-35 lbs! And the best part? They could be adhered to the roof with a special adhesive that I sourced from 3M. No holes drilled in the roof. They were only 3mm thick and flexible enough to be able to follow the gentle curves of the roof. After almost 3 years they showed NO signs of coming off or even a single gap around the edges.

The Problem:

While they are semi-flexible and worked well, there was a flaw in the design. The anodized aluminum the panel was based on slowly began to corrode. Inside the panel the aluminum was starting to touch the internal connecting wires between each solar cell. Once this happened, the entire panel was one gigantic electrical short. This means it was effectively dead. No power. I had some very expensive roof coverings on my RV and was no longer even partially self sufficient.

Back to the drawing board;

MPPT Controller (Left) Fuse Panel (Back) 
Everything else in the system was still functioning perfectly. No complaints about the charging controller, the wiring, the fuses and fuse panels at all. But without the solar panels supplying electricity, the whole system was down. I began to look into finding another manufacturer to create a better solar panel, one that wouldn't short out internally and that spoke English! After several false starts (see this article for a possible, why). I found one only a few miles from my home base. They actually manufacture solar panels in great quantities for large projects. I wish I had known they existed before!! After explaining the problem to them and showing the old panels to the boss, they began to figure out a better solution.

New Semi-Flexible Prototype
Ditch the Aluminum:

After a couple of weeks they came up with a solution. I know it sounds simple, but it really isn't! They figured, rightly so, that removing the aluminum from the sandwich would solve the problem at its' most basic level. Now they had to figure out how to do that while maintaining the strength of the solar panel itself. Since it will be glued tight to the roof of the RV, it can be a bit more flexible before it is installed. They experimented with a bunch of different materials for the sandwich until they had a set of working prototypes ready. To say that I was excited to see them was an understatement!

Upon arriving at the factory, I was first treated to a tour. REALLY, high tech... just the way you'd imagine a solar technology factory to be. They showed me all the test pieces they had made. Including all the failures. I had no idea what went into manufacturing a quality solar panel. I do now! The "finished" prototypes were beautiful. Thin, flexible and light. They power and efficiency testing they had done showed they would produce more power than the old China sourced aluminum failed ones and take up a bit less space. Score!

We transported them back to my home base to be installed (temporarily, no adhesive) on the roof to do some testing. The main difference is these are a lower voltage than the old panels. The old ones were 36V nominal. These are 24V nominal. I wanted to fully test their outputs through the MPPT controller before we decided to keep the design. Also, the third panel had a different measurement and number of cells, I would pick this one up later on for testing.
We just used some painters blue tape to attach them to the roof over the existing panels. This would work for power testing, but I knew we'd have to remove the old ones before the permanent install.

Since the 3M paralastic adhesive is incredibly strong and "stretchy," I KNEW the removal was going to be really difficult. Likely I would be destroying the (admittedly already dead) aluminum backed panels during the process. There was also the question as to whether the new backing material would be compatible with the adhesive.

Tune in next week for a report on our progress. We'll have a week or so of testing with the first two panels, taken delivery of the third and removed the old aluminum ones. So far everything seems to be on track. As most of you already know, Murphy was an optimist!

Be Seeing You...Down The Road,

Rich "The Wanderman"
www.thewanderman.com

***See the Original Article:  SOLAR PART 1

*See Part - 1
**See Part -2
***See Part - 3
****See Part - 4
*****See Part - 5
******See Part - 6

Wednesday, October 16, 2013

Get Into Those "Nooks & Crannies!" - A Cleaner With Fuzzy "Fingers."

    Well, it's here... the end of the season. While I may get a precious few more trips in before I have to winterize and cover my RV for the cold season, I usually use some of this cooler weather to finish the detailing of the inside. No matter how hard I try, or how often I dust... there's still accumulation of dirt and dust in the nooks & crannies of the RV. Usually a P.I.T.A. to get to, this little gadget will make you smile every time you need to reach a spot that seems utterly inaccessible! Well, here's a way to get to those places.


Seemed simple enough, a little pouch you put a finger or two in and use the fuzzy, dangly bits to get in there and clean. I'll admit, I was a bit skeptical with the descriptions I was seeing on marketing materials attached to gadgets. Especially given last weeks' Bacon & Egg debacle.

However I was pleasantly surprised this time. A really inexpensive gizmo that takes up very little storage space, yet can clean a myriad of things!

What's not to like?

The reality here is that it actually works quite well. The little fuzzy fingers do get into spots you'd normally miss if you were using a paper towel or a regular duster. They are soft enough to deform around and get into little crevices in and around the RV interior. The main problem I have with this: it showed just how poorly I had been cleaning my RV. The amount of gunk and dust being pulled out from these tiny spaces was incredible!

I am NOT a clean freak. Far from it! But it was like seeing a seedy motel room under black light for the first time. Nasty. This is a lesson to keep up on the cleaning periodically.

The only caveat about this little miracle worker? You have to have small fingers. Big folks will have to be happy with a single digit. Not a big deal, but you should know before you buy.

It IS machine washable, so getting the dirt OFF of it is pretty simple. I've washed it a couple of times now and it springs back to health each time.

For a couple of dollars, this is a keeper. I'll wager there are quite a few additional uses for this thing. Like cleaning the dust off my driving instruments before I leave.

I've been learning that things you can buy, that SEEM like the greatest thing since sliced bread aren't always what they seem. And more often than not, don't perform as advertised. This little beastie does. AND it will likely have a few more uses as soon as my imagination kicks in over the long dull winter.

Be Seeing You...Down The Road,

Rich "The Wanderman"
www.thewanderman.com


Wednesday, October 9, 2013

An EGGciting New Breakfast Gadget!

    Most of you already know, I'm a bit of a breakfast fan. Something about the amazing aromas wafting through the RV in the early (relatively!) AM and mixing with clean fresh air from outside on a crisp morning just gets me going. Add a bit of freshly brewed coffee and you are in store for a great day! I find and try various breakfast food gadgets whenever they strike me as interesting. Most of the time they work really well. Sometimes....not so much. Case in point:

Bacon & Egg Ease... sure sounds like a plan to me.

Bacon can be a P.I.T.A. to clean up and the splatter from a typical skillet is annoying to clean up. This handy gizmo seemed like a winner to me when I first saw it. The general idea? It looked as though you could cook your eggs on top and your bacon on the bottom, all automatically in your microwave in short order with an easy rinse water cleanup. Wipe it out and put it away.

 Ahhh, if only that was the case!


The reality isn't nearly as convenient. First you have to remove the clear plastic dome and use some cooking spray on the top egg cup. Next they tell you to pre-cook the bacon in the bottom silicone tray for some number of seconds. I tried the recommended one while running on my inverter... no good, had to add time. Then you add the egg and cook for additional time. Mine wasn't really done so i extended the time a bit.

BOOM!


The egg exploded, lifted the clear plastic dome and made a real mess. Usually, when I am using my older (better?) microwave egg cooker I pierce the yoke and white a few times with a fork so they can vent steam. No such directions for this cooking implement.

There is a little tab that is connected to a flat "floor" under the egg section. It will allow you to lift the (mostly exploded) section of egg out. The lower section, where the bacon cooks, is made of a very flexible silicone and has grooves in it to catch the grease. Well, that sounds like a good idea, but they are no where near tall enough to keep your bacon out of the grease. The distance between the top egg cooking part and the lower bacon cooking part is quite small so it's tough to manipulate.


Since the egg and the bacon cook together (mostly) you have to really get the timing perfect if you'd like both the egg and the bacon "your way." After many false starts, I precooked just the bacon for almost 2 minutes then added the egg and cooked for an additional minute. They were passable. It was then I realized that you've got to clean this whole thing. All four parts separate... but there are four of them. All spattered with bacon grease and egg bits. Most will wipe away with a moist paper towel, but you will be washing the rest in the sink with soap and water. Not exactly a water saver!

Now everyone knows I am a gadget lover. I'll find space to store anything that is a work or supplies saver when I travel. This one won't be joining me on any excursions. I may try to use it at home for a quick breakfast, especially where I have a dishwasher to clean it.... no, wait.... it's NOT dishwasher safe!!

Be Seeing You...Down The Road,

Rich "The Wanderman"
www.thewanderman.com


Wednesday, October 2, 2013

I Found It! A Better TPMS Deal - YMMV.

    As many of you already know, I have been looking at TPMS (Tire Pressure Monitoring Systems) for some time. I looked at pretty much everything available, both here in the US and available to ship in from China. Mostly, I found that the "cool" ones with lots of features were limited to 45psi tires, so wouldn't work on most RVs. The Truck or RV versions were decidedly "old school" with limited displays and no real features. The moral of this story? If you look hard enough and keep at it, you can uncover almost anything you want with some perseverance. 
When I began looking it was all about features I needed, features I wanted and the price. I knew I HAD to have both pressure and temperature monitoring, that was really to ensure the safety of myself, my passengers and my RV. I really WANTED to be able to see all the tires pressures and temperatures at the same time. The one-at-a-time style that flips through each one seemed too distracting to me. I wanted remote sensors that would screw onto my existing tire valves so I didn't have to unmount/mount and re-balance my tires every time I needed a battery change. I wanted a display that would fit comfortably on (or in) my dash, would be able to be hard wired so I wouldn't need to mess with batteries, and the display itself should be neat to look at AND informative.  

What's In The box?
Lastly, the price. Seems that the basic ones are around $250.00 and up depending on how many wheels/tires you'd like to monitor. Since I have only 4 tires (which makes having TPMS so critical for me!) I was at the low end of the price scale. Still, $250 sounds like a lot of money. We should be able to do better. After lots of tireless (pun intended) searching online I found a better deal!! This unit, the Whistler Tire Scout TS-104 reads from 0-99PSI and has a small, easy to read display. Retail it's 149.99. You can find a better price if you look around a bit. It includes 4 sensors, so it's great for me. Unfortunately, they do not make a model with more sensors so for many RVs, this will not work. There are alternatives, but with 6 or more sensors you are back up to that $250, not so magic, number.

Install is incredibly easy. First, unpack the box and put the batteries in the remote sensors. Each is marked with the tire/wheel location. (LF, RF, LR, RR)  Remove your existing valve caps, screw the sensors on in the proper location. Plug in the receiver and setup as per the directions. A few button pushes to customize and it's all working. I hard wired my receiver into my engine battery harness, but it does have a lithium ion battery pack that should last for quite a while. You COULD charge it periodically. I'm just too lazy for that!


I mounted the receiver on the left side of my dash, on top. It's small enough that it does not obstruct my view at all. Kind of "cute" really. Did I just say that? Sheesh! The system comes on when the vehicle is started and the sensors begin to transmit when you begin to drive. I did worry a bit about someone stealing the sensors, but more likely I'll go to put air in or check the pressure and leave it off. There is a small rubber seal inside the sensor that can get squished and destroyed if you screw them on improperly. There are 4 extras in the box. I did notice it can take a few seconds to a few minutes to see a reading, but that's not so bad. Besides, you should check your tires before every long trip... you do, don't you?

The receiver has customizable alerts. You can set the threshold for a warning. What PSI and/or temp is considered too low... or too high. It will tell you when it detects a rapid pressure loss with an icon and/or an alarm. Same thing for high temperatures. So far I haven't heard any. That's a good thing!

The big white button lights up when there is an alert, so it should get your attention pretty quickly.
the receiver's display is also back-lit so you can read it at night and in low light conditions.


All in all, I like it. Makes my trips safer and reduces the worry about a blowout. Low pressures and high temperatures can cause lots of problems. Keeping your tire pressures properly can save you gas! Seriously, low pressure in your tires will affect your gas mileage.

You can improve your gas mileage by up to 3.3 percent by keeping your tires inflated to the proper pressure. Under-inflated tires can lower gas mileage by 0.3 percent for every 1 psi drop in pressure of all four tires. So, obviously it's better and safer!

Tire pressure monitoring systems are now mandatory in all passenger cars in North America. I believe they are a worthwhile addition to any RV. Just the peace of mind, knowing what your tires are doing, makes road trips just a bit more relaxed. of course I hear every odd noise when i drive and paranoia runs rampant, but hey....that's me!

Be Seeing You...Down The Road,

Rich "The Wanderman"
www.thewanderman.com


Scout